![]()
Creating Polls and Surveys
Polls and surveys are a type of form. All of the same functionality is available and applies.
A poll is generally one question and appears on a site for a very short time: an hour or a day.
A survey is usually multiple questions and appears on your site for a longer time than a poll.
Note: For information on scheduling when your polls and surveys appear on the site, see Scheduling Content to Begin and End.
With polls and surveys, you can show ongoing results to site visitors after they submit their answers.
Important: For complete understanding of forms, polls, and surveys, see Working with HTML Forms.
The following sections provide information about creating a poll or survey beyond the normal form information.
Making Form Results Available to Site Users
For information on how to display a poll or survey on a Web site, see Poll Server Control.
Working With Polls
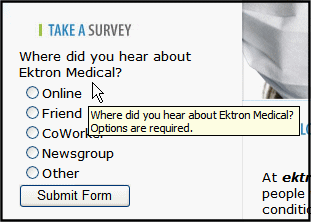
Below is an example of a poll. Note that when a site visitor hovers over the poll, the question also appears as Tooltip text.
This subsection contains the following:
Creating a New Poll in the Workarea
Replacing a Poll from the Web Site
Editing a Poll from the Web Site
Creating a New Poll in the Workarea
To create a new poll, follow these steps.
Note: You can also create a new edition of a poll in another language by copying an existing poll and translating it. For more information, see Translating Content to Another Language.
Note: For the steps to create a new form, see Creating a New Form. For the steps to create a new survey, see Creating a Survey.
1. From the View menu, click Language, and select the language in which to create the poll.
2. Click New > HTML Form/Survey.
3. The New Form screen appears.
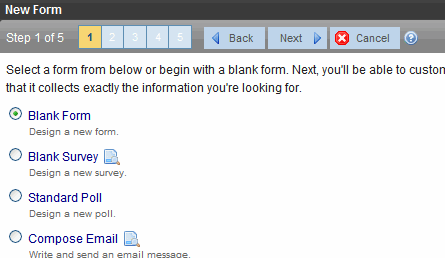
Note: If you choose Standard Poll or Blank Survey, the number of steps in the Forms Wizard changes from five to four. This happens because the Assign Tasks step is removed.
4. Choose Standard Poll. You can click preview ( ) next to any sample form to preview it before choosing it.
5. Click Next.
6. Enter or edit the form’s Title and Description.
Title - used to reference the poll within the Workarea (required)
Description - an extended description of the poll
7. Click Next.
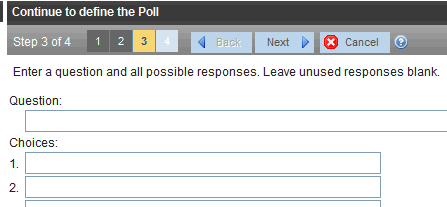
8. This screen lets you add a poll question and possible replies.
Note: This screen allows you to add up to eight replies. If you have more than eight replies, you can add them in the forms editor after clicking Done.
9. Click Next.
10. This screen indicates that you have entered the basic poll information and should click Done to further edit and view the form’s fields.
11. After clicking Done, the form editor launches so you can edit existing fields and properties. In addition, you can set post back and schedule information, add metadata and comments, change the title, and submit the poll for publication.
Note: From this screen, you can add more replies to your poll by right clicking on the choices field and clicking properties. See Also: Inserting a Choices Field.
Replacing a Poll from the Web Site
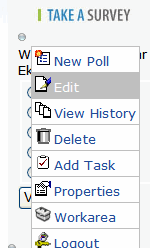
When logged into Ektron CMS400.NET, you can right click on a poll and choose New Poll to replace the current one. The title of the poll, its ID, and properties stay the same. Only the questions and answers change.
To replace a poll, follow these steps.
1. Log into Ektron CMS400.NET.
2. Navigate to the Web page that hosts the poll.
3. At the location of the poll, click the silver access point and choose New Poll.

4. The Workarea opens, indicating you are at step three of the Poll Wizard.
5. Add a new question to the Question text box.
6. Add possible responses to the Choices text boxes.
7. Click Next.
8. Click Done.
9. The form editor launches, allowing you to edit the fields and properties. In addition, you can set post back and schedule information, add metadata and comments, change the title and submit the poll for publication.
10. Once published, the updated poll appears on the site.
Editing a Poll from the Web Site
To edit an poll on a Web site, follow these steps.
Warning! If you are logged into the site and create a new poll by right clicking on a poll selecting New, the existing poll is replaced by the new one.
1. Log on to the Ektron CMS400.NET Web site.
2. Click the sliver access point on the poll you want to change and click Edit.
3. Make changes to the poll using the Forms editor.
4. Submit the poll to the Approval Process.
Creating a Survey
To create a new survey, follow these steps.
Note: You can also create a new edition of a survey in another language by copying an existing form and translating it. For more information, see Translating Content to Another Language.
Note: For the steps to create a new poll, see Working With Polls. For the steps to create a new form, see Creating a New Form.
1. Consult with your Ektron CMS400.NET administrator about the folders in which you should create polls. See Also: Forms Must Use Template with FormBlock Server Control
2. From the View menu, click Language, and select the language in which to create the form.
3. Click New > HTML Form/Survey.
4. The New Form screen appears.
Note: When you choose Standard Poll or Blank Survey, the number of steps in the Forms Wizard changes from five steps to four steps. This happens because the Assign Tasks step is removed.
5. Choose Blank Survey. You can click preview () next to any sample form to preview it before choosing it.
6. Click Next.
7. Enter or edit the form’s Title and Description.
Title - used to reference the survey within the Workarea (required)
Description - an extended description of the survey.
8. Click Next.
9. This screen lets you determine what happens after the site visitor completes the survey. The choices are:
Display a message - See Composing the Postback Message
Redirect to a file or page - Identify a file or a page on your Web site that is launched when the visitor completes the form
- An example of a file is a white paper (a common file format is .PDF) that the visitor requested
- An example of a page is one that lets the visitor download your product
Redirect to an action page and forward form data - See Redirect to an Action Page and Forward Form Data
Report on the form - See Making Form Results Available to Site Users
10. Click Next.
11. A screen indicates that you have entered basic information about the survey and should click Done to enter the survey’s content. This procedure is described in Creating a Form’s Content.


![]()